What Cycle Touring Actually Involves
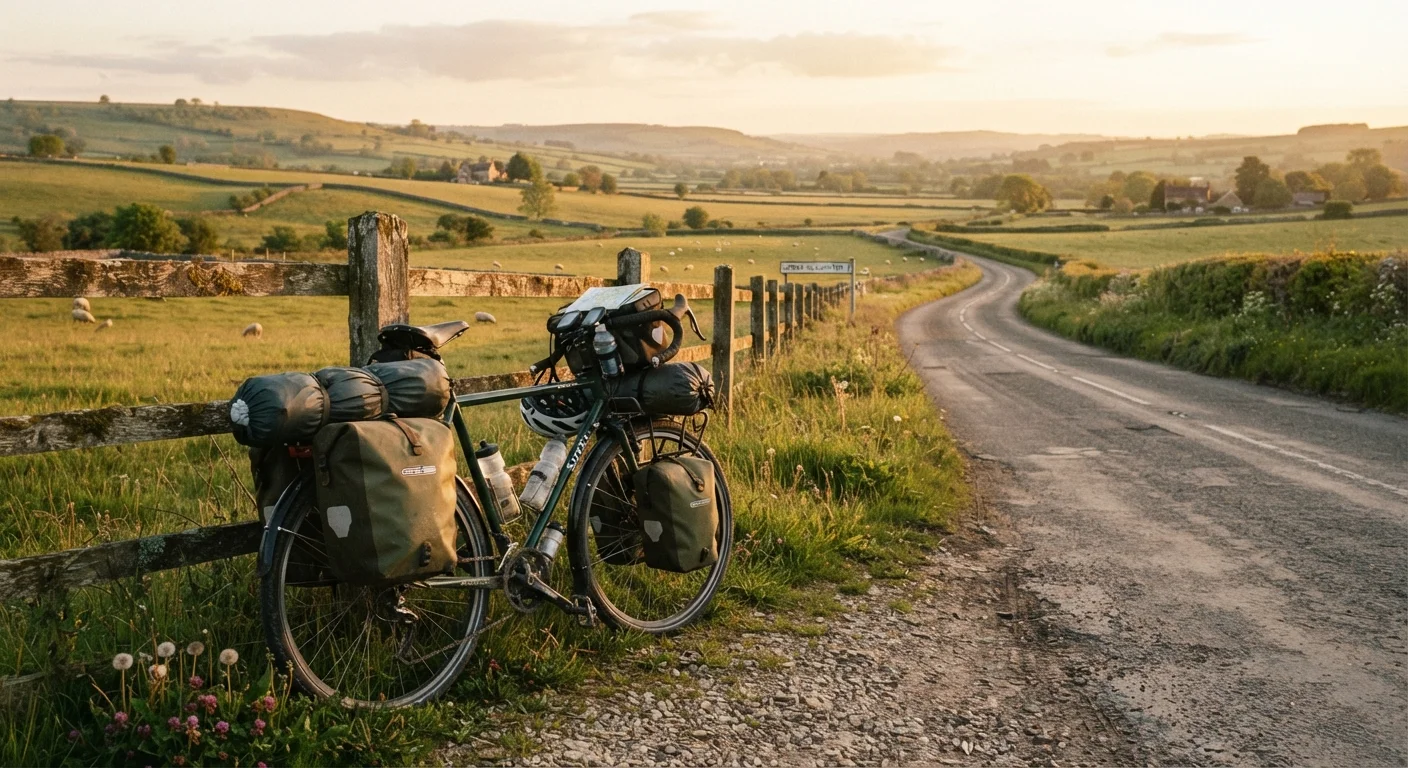
Cycle touring is self-supported travel by bicycle - carrying your gear, choosing your own pace, and covering ground under your own power. It spans a wide spectrum, from a single overnight trip on local trails to multi-month continental crossings. What distinguishes it from recreational cycling is the self-sufficiency component: you're responsible for navigating, fueling, and sheltering yourself along the way.
The appeal is partly practical - touring lets you move through places at a scale cars and even motorcycles miss - and partly philosophical. It's a slower, more deliberate way to travel, closer in spirit to backpacking than road-tripping. If the idea of a controlled, automotive long-haul appeals to you instead, our guide to planning a first solo road trip covers that parallel skill set well.
Cycle touring doesn't require exceptional fitness to begin. It rewards consistency and preparation far more than raw athletic ability.
Panniers
Bags designed to clip onto a bicycle rack, typically in pairs. They distribute load on either side of the wheel axle and are the most common carrying method for traditional cycle touring.
Bikepacking bags
A system of bags that attach directly to the bike frame, fork, and handlebars using straps rather than a rack. They keep weight low and central, which suits off-road and mixed-terrain touring.
Rack eyelets
Small threaded metal holes built into a bike's frame and fork dropouts. They allow standard racks to be bolted securely to the bike - bikes without them require workaround solutions for load carrying.
Cassette
The cluster of sprockets attached to the rear wheel hub. A wide-range cassette gives you very low gears for climbing hills under load - essential for practical touring use.
Self-supported touring
A style of travel where the cyclist carries all their own gear and arranges their own food, water, and shelter, rather than relying on a support vehicle or pre-arranged services.
Load distribution
How the weight of your gear is spread between the front and rear of the bike. Getting this balance right - roughly 40% front, 60% rear - keeps the bike stable and predictable to handle.
Choosing the Right Bike for Touring
The most important bike characteristic for touring isn't brand or price - it's fit and load-carrying geometry. A bike that positions you upright enough to sustain hours in the saddle, with a stable wheelbase that doesn't squirm under panniers, will outperform a flashier machine that's wrong for the task.
Look for these structural features when evaluating a bike for touring use:
- Rack mounts (eyelets): Threaded mounting points on the frame and fork allow you to attach conventional rear and front racks without improvisation.
- Wide tire clearance: At least 35mm, ideally 40mm or more. Wider tires absorb road vibration, carry load more stably, and handle varied surfaces.
- Lower gearing range: Loaded climbing requires gears your road bike likely doesn't have. A compact chainring and wide-range cassette combination is worth confirming before you commit.
- Relaxed geometry: Longer chainstays and a more upright head tube angle improve stability under load compared with performance-oriented geometry.
Dedicated touring bikes are engineered around all of these factors. Gravel bikes and flat-bar hybrids often tick most boxes and are a practical starting point. Drop-bar road bikes usually fall short on rack mounts and tire clearance without modification.
Essential Gear and Carrying Systems
How you carry gear matters as much as what you carry. Poor load distribution creates handling instability that compounds over a long day - a front-heavy setup makes steering twitchy; rear-only loading stresses the back wheel and makes the front light. The conventional approach: 60% of load weight over the rear axle, 40% over the front.
The two main carrying systems are panniers (bags that clip to racks) and bikepacking bags (framebag, handlebar roll, seat pack). Panniers offer more volume and easier packing; bikepacking bags sit closer to the bike's center of gravity and suit off-road terrain better. Many tourers use a hybrid of both. For a detailed look at load distribution and bag choices, see our guide to packing a bikepacking kit.
Gear categories worth addressing before your first trip:
- Shelter: Lightweight three-season tent, or confirmed accommodation bookings if you prefer supported touring.
- Sleeping system: Sleeping bag and pad rated to expected overnight temperatures.
- Clothing: Waterproof outer layer, thermal base layer, cycling-specific shorts or padded liner for saddle comfort.
- Nutrition and hydration: Two water bottles minimum, plus capacity for longer dry stretches. High-calorie portable food for between stops.
- Navigation: GPS device or phone mount with offline maps downloaded. Paper backup for areas with poor signal.
Test Your Setup Before Your First Overnight
Load your bike exactly as you plan to tour and ride a 20-mile loop close to home before committing to a multi-day trip. This surfaces saddle comfort issues, handling problems from load imbalance, and gear you packed but don't actually need - all fixable before you're far from home.
Accessories that improve daily comfort on the bike - saddle choice, bar tape, and ergonomic grips - translate directly to touring endurance. Our article on comfort accessories for long cycling covers what makes the most practical difference.
Route Planning and Building Distance Safely
New tourers consistently underestimate how much elevation gain affects daily output. A 50-mile flat route and a 50-mile route with 3,000 feet of climbing are not equivalent efforts - especially with a loaded bike. When planning, look at total elevation gain alongside distance, and build in buffer time for headwinds, rough surfaces, and unplanned stops.
Practical planning principles:
- Start shorter than you think you need to. A two-night shakedown trip of 30-40 miles each way lets you test your kit, identify comfort issues, and calibrate your realistic daily range before a longer commitment.
- Plan water and food sources explicitly. Identify resupply points on the map in advance. Rural routes can have long gaps between stores or restaurants.
- Use a conservative daily mileage target. Arriving at camp with energy to spare is better than limping in exhausted. Most experienced tourers plan to 70-80% of their maximum capacity.
- Check road surface quality. Satellite map layers and cycling-specific route tools can flag gravel, unpaved sections, or high-traffic roads before you commit to a path.
Touring Is Not All-or-Nothing
You don't need to commit to wild camping and fully self-supported travel from the start. Many tourers begin with supported itineraries - booking guesthouses or hostels in advance - which removes the shelter and camp-cooking variables and lets you focus on the cycling itself. Building complexity gradually is a legitimate and widely practiced approach.
On-Road Maintenance and Safety Basics
Mechanical self-sufficiency is a practical requirement for touring, not an optional upgrade. You won't always be near a bike shop when something goes wrong. The good news: most touring failures fall into a narrow set of problems that are learnable in an afternoon.
Core skills to practice before departure:
- Removing a wheel and replacing an inner tube (practice until you can do it in under 10 minutes)
- Adjusting brake cable tension with a barrel adjuster
- Re-seating a chain that has dropped or reconnecting a broken link with a master link
- Tightening rack bolts and checking for frame flex under load
Minimum repair kit contents: spare inner tubes (at least two), tire levers, patch kit, pump or CO₂ inflator, multi-tool with chain breaker, spare master links, small amount of chain lube, and electrical tape for temporary fixes. For more involved mechanical work and when to hand something to a professional, our DIY maintenance guide provides useful framing around task complexity and safety.
On safety: wear a helmet, use front and rear lights even in daylight (daytime running lights improve visibility to drivers), and position yourself confidently and predictably in traffic. On multi-day tours, share your itinerary with someone not on the trip and check in at the end of each day.