Why Sealant Fails - and Why It Matters
RV sealants face conditions that degrade most materials quickly: sustained UV radiation, temperature swings from freezing nights to 100°F summer afternoons, constant road vibration, and seasonal pressure washing. Even quality products begin to oxidize, crack, and separate from substrates after one to three years. The problem is that failure is often invisible from the ground until moisture has already penetrated and spread.
Water intrusion through failed sealant is consistently cited by RV service professionals as one of the most common - and most preventable - causes of major structural repairs. Once moisture reaches the wood substrate beneath fiberglass sidewalls or under a rubber roof membrane, rot and delamination follow. Repair costs at that stage are disproportionate to what a tube of sealant and two hours of labor would have prevented.
For a broader look at how water-related challenges affect new RV owners, see our piece on water and tank management mistakes. And for owners focused specifically on roof health, our RV roof care guide covers membrane types, aging patterns, and inspection intervals in depth.
Not All RV Roofs Support Foot Traffic
Before stepping onto any RV roof, consult your owner's manual for weight limits and approved walking paths - some roof designs are not rated for full foot traffic. Use a stable ladder, wear non-slip footwear, and never work alone at height. If you have any doubt about safe roof access, have a certified RV technician perform the inspection and resealing instead.
Where to Look: High-Risk Inspection Points
Every exterior location where dissimilar materials meet - or where a penetration pierces the roof or wall - is a potential failure site. Prioritize these areas during any inspection:
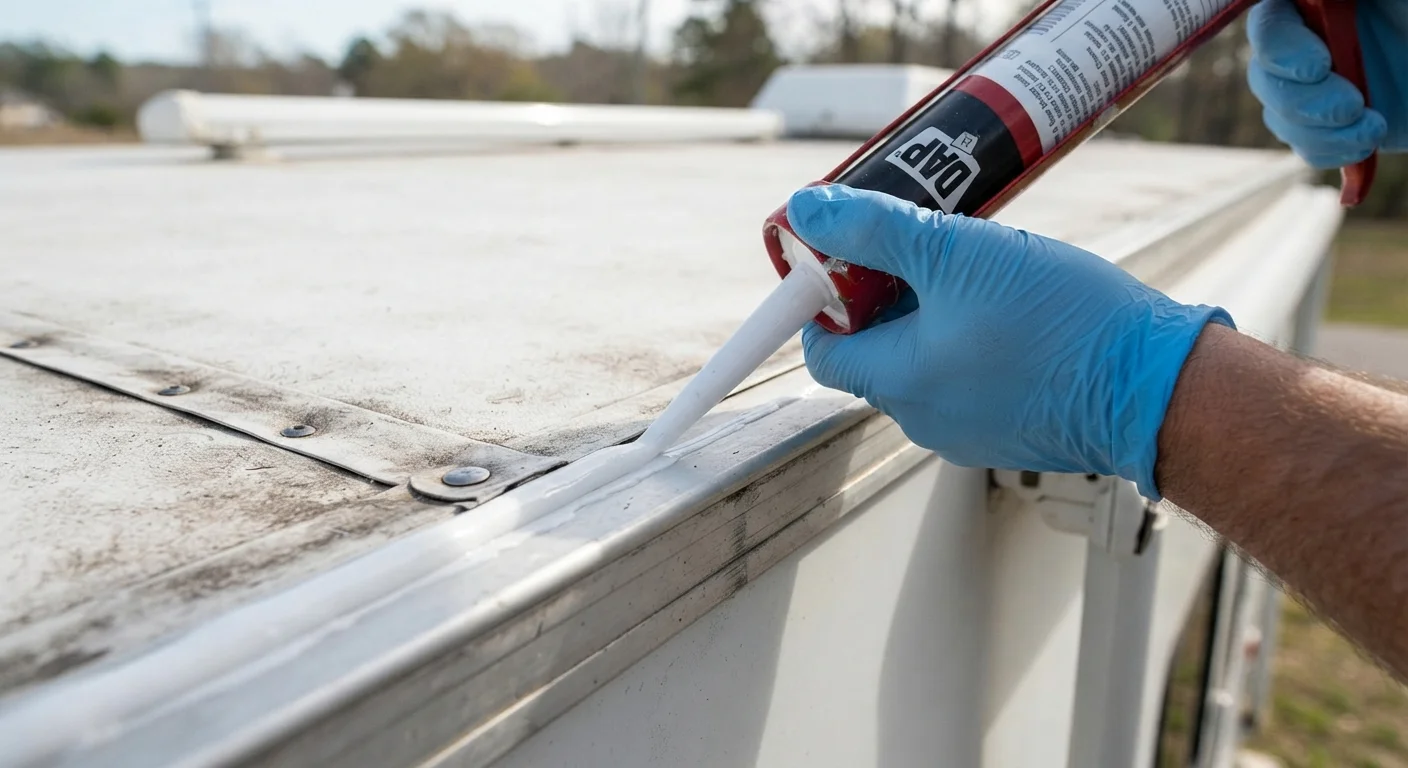
- Roof perimeter seams - where the membrane meets the front, rear, and side caps
- Vent and skylight flanges - AC units, bathroom vents, refrigerator exhaust vents, and roof-mounted antenna bases
- Slide-out surrounds - the caulk bead around the full perimeter of each slide-out opening; for detail on slide-specific seal problems, see why slide-out seals fail
- Window and door frames - particularly the upper edge where water runs directly down the sidewall
- Sidewall seams and corner caps - horizontal and vertical joints in aluminum or fiberglass siding
- Utility compartment cutouts - shore power inlets, cable TV ports, water connections, and outdoor kitchen openings
Interior signs of moisture intrusion - ceiling stains, soft wallboard, or a musty odor - should prompt an immediate exterior inspection, not just cosmetic interior repair.
Water Damage Compounds Quickly Once Sealant Fails
A gap as small as a hairline crack in a roof seam can allow water to wick into decking, framing, and insulation within a single rainy season. RV structural wood begins to delaminate and rot when moisture levels stay elevated, and repairs at that stage often cost thousands of dollars. Consistent resealing is the primary defense against the most expensive category of RV damage - not optional upkeep.
Materials and Tools You'll Need
Gathering the right materials before you start prevents mid-job delays and reduces the risk of using an incompatible product under time pressure. Confirm your roof material type before purchasing sealant - EPDM, TPO, fiberglass, and aluminum each have specific compatibility requirements.
Plastic scraper or putty knife
Removes old, cracked sealant without scratching the roof membrane or sidewall surface.
Lap sealant (self-leveling for roofs, non-sag for vertical surfaces)
Primary material used to seal roof seams, vent flanges, and horizontal joints.
Butyl-based caulk
Used for sidewall penetrations, window frames, and slide-out surrounds on most RV wall materials.
Isopropyl alcohol (70% or higher) and clean rags
Cleans and degreases surfaces so new sealant bonds correctly.
Caulk gun
Provides controlled, even application of tube-packaged sealants.
Painter's tape
Masks edges for cleaner sealant lines on cosmetically visible areas.
Flashlight or inspection mirror
Helps examine hard-to-see areas around vents, antennas, and interior corners.
If you're uncertain whether this repair falls within confident DIY territory or warrants professional assessment, our guide on DIY versus certified technician repairs provides a practical decision framework. Additional DIY repair resources are also available through our DIY repairs hub.
What you will need
The Resealing Process: Step by Step
Follow the steps below in sequence. Skipping the preparation stages - particularly surface cleaning and complete removal of old sealant - is the most common reason resealing jobs fail prematurely and require a redo within the same season.
Conduct a full exterior inspection
Before touching any sealant, walk the entire exterior with fresh eyes. Examine every point where two materials meet: the roofline, all four corners, window and door frames, slide-out surrounds, utility compartment doors, and any antenna or vent base. Look for cracking, bubbling, separation, discoloration, or missing sections. Also check the interior ceiling and walls for soft spots or staining - these are signs moisture has already entered. Document every problem area before you begin work.
Identify the correct sealant type for each surface
Sealant compatibility matters more than most owners realize. Using a silicone-based product on an EPDM rubber roof, for example, can prevent future adhesion and accelerate membrane degradation. Match product to surface: self-leveling lap sealant for horizontal roof seams, non-sag lap sealant for vertical joints, and butyl tape or butyl caulk for window and door frames. If your owner's manual specifies a sealant type, use that as your baseline. When compatibility is uncertain, consult an RV service center before proceeding.
Remove all failing sealant completely
Use a plastic scraper to lift and peel away old sealant. Work slowly and avoid gouging the substrate. On rubber roofs, a plastic tool is essential - metal can puncture the membrane. Remove every fragment, including residue embedded in seams. If the sealant is extremely hardened, a manufacturer-approved sealant remover solution can soften it first. Applying new sealant over old, failed material is the most common reason resealing jobs fail within a single season.
Clean and prep every surface
Wipe all bare seam areas thoroughly with isopropyl alcohol on a lint-free cloth. Allow surfaces to dry completely - at least five minutes - before applying any new sealant. Residual grease, dirt, or moisture will compromise adhesion significantly. On fiberglass sidewalls, a dedicated RV prep cleaner may be needed to remove oxidation. The cleaner the surface, the longer the new sealant will last.
Apply new sealant with consistent coverage
Load your caulk gun and cut the nozzle at a 45-degree angle for controlled flow. Apply sealant in a continuous bead that fully overlaps the seam by at least half an inch on each side. On roof joints, self-leveling sealant will spread naturally - do not over-tool it. On vertical surfaces, use a dampened finger or smoothing tool to press the sealant firmly into the joint. Aim for complete coverage with no air pockets or thin spots.
Allow full cure time before weather exposure
Most lap sealants skin over within one to two hours but require 24 to 72 hours for a full cure, depending on temperature and humidity. Do not wash the RV or allow rain exposure during this window. Check the product's technical data sheet for specific cure times. Once cured, inspect the new sealant one final time to confirm no gaps opened during drying.
Build Resealing Into Your Maintenance Calendar
Most RV lap sealants have a functional lifespan of one to three years depending on UV exposure and climate. A biannual inspection - spring and fall - is far less expensive than repairing the water damage deferred maintenance invites. Pairing this task with your seasonal storage prep is efficient; see our winterizing walkthrough for a full pre-storage checklist.