How an RV Water System Is Structured
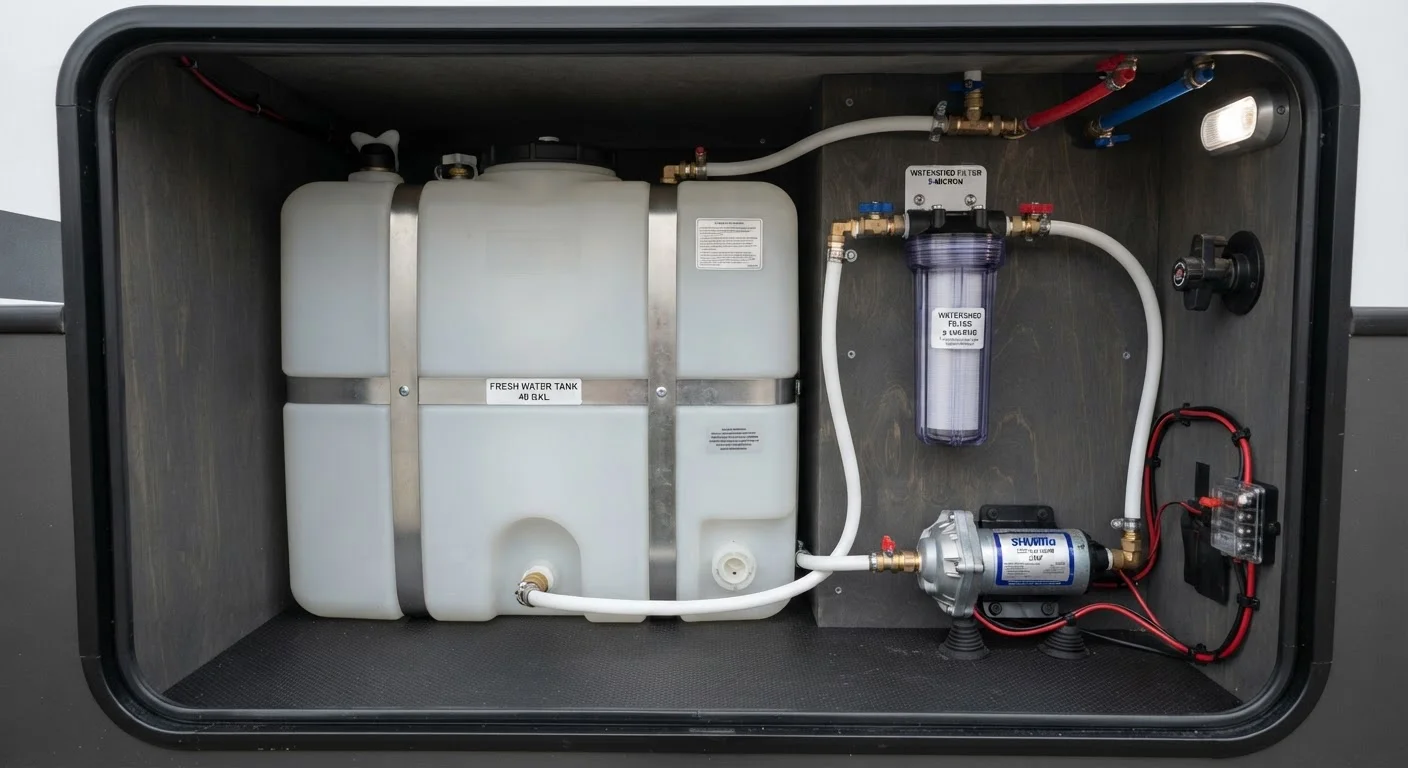
An RV's fresh water system is a self-contained loop that draws from an onboard storage tank, pressurises the lines with a 12-volt demand pump, passes water through one or more filters, and delivers it to the sink, shower, and toilet. Understanding this flow end-to-end is the fastest way to diagnose problems and make informed decisions about upgrades.
The system splits into two supply modes: tank mode, where your onboard reservoir is the sole source, and city-water mode, where a pressurised hose connection at a campsite bypasses the pump entirely. Both modes share the same downstream plumbing - filters, lines, and fixtures - so the components you choose affect performance in either scenario.
For a broader look at how water management fits into the full off-grid picture, see our off-grid RV living guide.
5-10 gal
Daily water use per person in an RV
General estimate based on moderate use including cooking, hand-washing, and brief showers - conservation measures can bring this lower.
40-80 PSI
Typical campground water pedestal pressure
Pressure that exceeds an RV's plumbing rating without a regulator in line; most RV systems are designed for 40-50 PSI.
35-55 PSI
Output pressure range of most factory RV pumps
Higher-end aftermarket demand pumps can reach 65 PSI, improving shower performance on larger rigs with longer line runs.
Fresh Water Tank Capacity and Sizing
Factory-installed fresh water tanks in RVs range from roughly 20 gallons in compact Class B vans to over 100 gallons in large Class A motorhomes. The right capacity depends on your camping style far more than your rig's size.
- Full-hookup campers: Tank capacity matters less; you're replenishing from a hose at each site.
- Dry campers / boondockers: A larger tank buys independence. At roughly 5-10 gallons per person per day for moderate use (cooking, hand-washing, brief showers), a 50-gallon tank gives a couple about five days of autonomy.
- Weekend overlanders: A 20-30 gallon tank typically covers two to three nights without resupply.
Tanks are usually made from polyethylene and are UV-stabilised when mounted externally. Internal tanks are generally better protected from temperature swings but harder to inspect. Regardless of material, tanks should be drained and sanitised regularly to prevent bacterial growth - a task covered in detail in our fresh water system maintenance reference.
When estimating tank range, subtract 10-15% from the stated tank capacity - most tanks have unusable volume at the bottom due to outlet placement and sloshing losses on uneven terrain.
Assuming full usable capacity leads to dry-camping miscalculations; building in a buffer prevents running out of water unexpectedly.
Label your fresh water hose and store it separately from hoses used for flushing - cross-contamination is a real sanitation risk that is easily avoided with colour-coding or dedicated storage bags.
Campground hose mix-ups are a well-documented source of potable water contamination in RV setups and take seconds to prevent.
12V Water Pumps: Pressure, Flow, and Selection
Most RVs use a demand-style 12V diaphragm pump that activates automatically when a tap is opened and pressure in the line drops below a set threshold. Key specifications to understand:
- Flow rate
- Measured in gallons per minute (GPM). Most RV pumps deliver 1-4 GPM. Higher flow rates support simultaneous fixture use without pressure drops.
- Pressure rating
- Measured in PSI. Factory pumps typically run 35-55 PSI. A pump at the lower end of that range can feel sluggish at the showerhead.
- Noise
- Diaphragm pumps cycle audibly. Mounting pads and accumulator tanks (small pressurised reservoirs that absorb pressure spikes) significantly reduce cycling frequency and noise.
If your pump cycles on and off rapidly even when no tap is open, suspect a waterlogged accumulator tank or a small leak in the system - both are worth investigating before assuming the pump has failed.
Never Run Your Pump Dry
Operating a diaphragm pump without water in the system can damage the pump's internal seals within minutes. Before priming the system after a tank refill, confirm water is present before switching the pump on. Many RVers add a low-water shutoff switch as an inexpensive safeguard.
Filter Types and What They Actually Remove
Filtration is not one-size-fits-all. The appropriate filter depends on your water sources and what contaminants concern you most.
| Filter Type | What It Addresses | Typical Location |
|---|---|---|
| Sediment (5-50 micron) | Sand, rust, particulates | Inline, at city-water inlet |
| Activated carbon | Chlorine taste, odour, some VOCs | Inline or under-sink canister |
| KDF media | Heavy metals (lead, mercury), bacteria inhibition | Often combined with carbon |
| Reverse osmosis (RO) | Dissolved solids, nitrates, most contaminants | Under-sink, countertop |
A practical starting point for most RVers is a dual-stage canister: sediment pre-filter followed by a carbon block. This combination handles the most common quality complaints without the complexity or wastewater output of RO. If you draw from wells or questionable municipal sources frequently, adding a KDF stage provides meaningful extra protection.
Replace filter cartridges on a schedule - not just when water tastes different. A clogged sediment filter stresses your pump and can harbour bacteria even if flow seems adequate.
Connecting to Shore Water vs. Running on Tank
Campground water pedestals typically deliver 40-80 PSI - well above what most RV plumbing is rated to handle continuously. Always use a pressure regulator between the pedestal and your city-water inlet. Preset regulators (typically capped at 40-50 PSI) are inexpensive and eliminate the risk of blown fittings or damaged appliances.
A inline filter at the hose inlet is equally important in city-water mode; campground supplies vary in sediment content and taste. You can use a garden-hose-thread canister filter that lives between the regulator and your RV's inlet port.
For a full breakdown of hookup connections - including electrical and sewer - see RV Hookup Connections Explained.
Use a Drinking-Water-Safe Hose
Standard garden hoses can leach plasticisers and impart a chemical taste to water. Look for hoses specifically labelled for drinking water or potable water use - they use materials rated safe for contact with water intended for consumption. This applies to both fill hoses and city-water connection hoses.
Sanitising Your Fresh Water Tank
Tanks should be sanitised at the start of each camping season, after the rig has sat unused for several weeks, and any time you notice off-taste or odour from the tap. The standard procedure uses unscented liquid household bleach (sodium hypochlorite).
- Calculate dosage: roughly ¼ teaspoon of bleach per gallon of tank capacity.
- Dilute bleach in a gallon of water before adding to the tank - never pour concentrate directly in.
- Fill the tank completely and run water through every fixture until you smell chlorine at each tap.
- Let the solution sit for at least four hours (overnight is preferable).
- Drain fully, then refill with fresh water and flush until the chlorine smell is gone.
This process is straightforward but easily skipped - which is one of the most common early mistakes new RV owners make. For a full discussion of what goes wrong with tank management, see Why New RVers Struggle with Water and Tank Management.
Bleach Concentration Matters
Household bleach concentration varies - common formulations are 6% and 8.25% sodium hypochlorite. Adjust your dosage calculation if using a higher-concentration product; the goal is effective sanitisation without leaving a residue that's difficult to flush. Check the label before measuring.
Winterisation Basics for the Water System
Water left in lines and tanks when temperatures drop below freezing can expand, crack pipes, split fittings, and damage the pump. Winterisation is not optional in cold climates - it is basic asset protection.
Two methods are widely used:
- Compressed air blow-out: An air compressor (with an RV blow-out plug adapter) pushes water out of each line. Effective, but requires a compressor and careful technique - excessive pressure can damage fittings. This method is best handled by someone familiar with their specific plumbing layout.
- Non-toxic RV antifreeze: Propylene glycol-based antifreeze rated for potable water systems is pumped through the lines. It is safe for pipes and fixtures, leaves a residue that must be flushed out in spring, and is generally more forgiving than the blow-out method for first-timers.
Either way, the water heater bypass valve must be engaged before winterising - otherwise you'll waste antifreeze or blow-out effort filling the heater tank. Drain the water heater separately per manufacturer guidance.
For a complete seasonal walkthrough, including tyres, batteries, and interior prep, see Winterising Your RV: A Season-End Walkthrough. Year-round scheduling fits into the broader Full-Year RV Maintenance Calendar.